Crater Rim Walkway
- 1 day one way
- Easy/medium
- Ahuriri Scenic Reserve to Sign of the Bellbird: 1 hour 15 minutes, 4.4km
- Sign of the Bellbird to Sign of the Kiwi: 1 hour, 4.4km
- Sign of the Kiwi to Rāpaki Rock: 1 hour 15 minutes, 3.5km
- Rāpaki Rock to Bridle Path: 1 hour, 3.5km
- Bridle Path to Tauhinukorokio / Mount Pleasant: 35 minutes, 2.4km
- Remainder to come
Follow the ridge of the volcanic Port Hills above Christchurch.
|
Walking time
|
1 day
9 hr
|
|---|---|
|
Distance
|
20.0km |
|
Type
|
One way
|
|
Grade
|
Easy/medium |
|
Bookings
|
No bookings — open access
No — open access
|
|
Starts
|
Ahuriri Scenic Reserve, Summit Road, Christchurch |
|---|---|
|
Ends
|
Godley Head |
|
Maps
|
NZTopo50-BX24
|
|
Altitude
|
200m
–
500m
Altitude change 300m
|
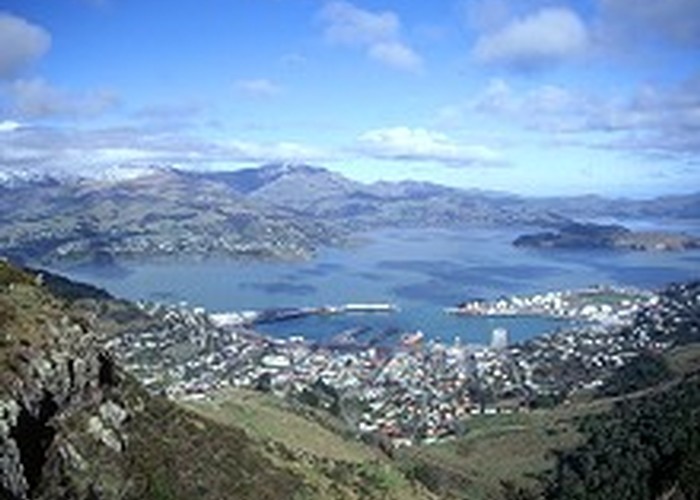
The Crater Rim Walkway follows the arcing rim of the extinct Lyttelton Volcano, from Ahuriri Reserve in the south out to Awaroa / Godley Head in the east. The trail explores the history, geology, and remnant native vegetation of the area.
The track is well accessed by the Summit Road, and most popularly walked in short segments. The central sections are busy, but the ends feel relatively isolated and remote.
With the new Godley Head Campsite now in place, you could now walk the track as an overnight trip: a handy first tramp for kids perhaps. Just decide how far you want to walk, then start that distance back from Godley Head!
Sections of the track cross private property. Keep to the track on these sections.
Note: Following the 2011 Christchurch Earthquake, Summit Road is closed to cars between Rāpaki Rock car park and Mount Cavendish. It is open to bicycle and walking access.
Ahuriri Scenic Reserve to Sign of the Bellbird
Driving along Summit Road, head on past Rhodes Spring and Gibralter Rock, to a pocket of bush. Tōtara and kahikatea at the roadside give it a damp West Coast feel, although just half an hour from the central city. The road tips over into Lyttelton Harbour and crosses a cattle stop. This is the start of the Crater Rim Walkway. Parking here is scratchy, by the cattle stop or a little farther down the road.
Head up some steps into a classic Port Hills forest of tree fuchsia and horopito. Out in moments onto a grassy ridge, the track heads toward Coopers Knob / Ōmawete (573m). This is the first of a series of dramatic outcrops, near vertical on the harbour side and gently sloping on the city flanks. The track eases over the back of the knob through a patch of forest with wind-sculpted tōtara trees then climbs out onto grass and dropping back toward the road. A track leading up onto the summit of Coopers Knob heads off to the right.
Passing Living Springs deep in the valley on the harbour side, the track climbs through forest and harakeke out onto the sloping back of a bluff.
The next landmark is Cass Peak / Ō-Rongo-Mai (545m) with its distinctive air traffic control dome. Cass Peak was badly burned by the January 2017 wildfires. The track sidles through burned scrub on the harbour side before leading into a delightful pocket of forest beneath bluffs. Watch for a switch-back and rocky climb up out of the forest into scrubby, burned over forest. If you are heading southbound, it is easy to miss the track and end up on a steep rocky outcrop here — retrace your steps. The track leads through fully burned forest, past a couple of beech trees to the Sign of the Bellbird car park. A covered shelter and toilet is located here.
Sign of the Bellbird to Sign of the Kiwi
The Sign of the Bellbird and Sign of the Kiwi were planned as rest houses to serve travellers on the Summit Road. While the Sign of the Bellbird is now simply a stone shelter, the Kiwi still serves as a busy cafe. They are linked by a short and easy section of the Crater Rim Walkway.
From the Bellbird car park, a track climbs up the ridge past a tōtara tree, over red volcanic soil and through burned scrub. As the track climbs up and over Mount Ada, Ella's Track veers off around the eastern slopes. Mount Ada was thoroughly burned by the January 2017 fires, although replanting is under way.
Beyond Mount Ada, the track drops to the car park at the top of the Bivvy Track and wanders easily next to the road. passing the top of the Bush Road and Watlings Tracks, the track enters Hoon Hay Scenic Reserve, climbing up through harakeke. The grassy track passes the end of the Trig V side track and drops down to the Hoon Hay car park. Cross Summit and Worsleys Roads here to the track continuing on a scorched hillside above the Summit Road. The track soon crosses back, passes some matagouri scrub and winds around Coronation Hill. The Sign of the Kiwi is located at the busy junction of Summit and Dyers Pass Roads. Aside from the cafe, toilets and a water fountain are located here.
Sign of the Kiwi to Rāpaki Rock
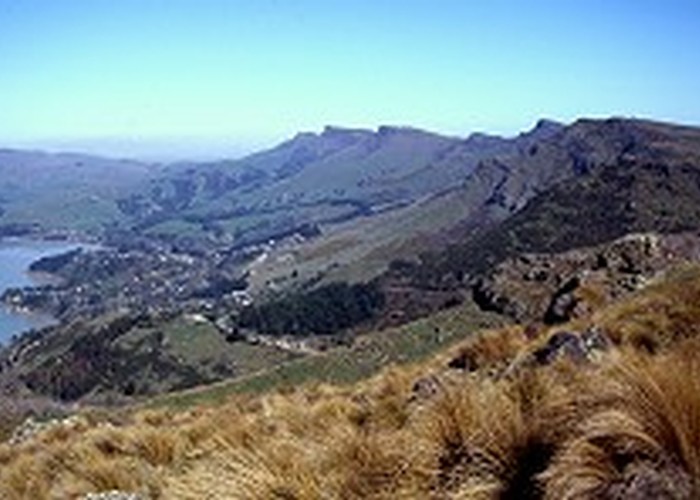
Across the road, the marked track leads up steps on Cedrics Track. Turn off onto Mitchells, which leads through the cool forest on the inner flanks of Sugarloaf. The distinctive TV/radio mast atop Sugarloaf is overhead.
The track soon comes out of forest at the road east of Sugarloaf, and sidles above the road through Scott Scenic Reserve. This area is planted with a mix of pines, cedar, and cypress. The track drops back to the road for at striking view past the back of Mount Vernon to Rāpaki Rock and Witch Hill.
A tussocky slope leads up Mount Vernon to its boulder strewn summit, then quickly down past a lonely tōtara tree to the Rāpaki Rock car park. The popular Rāpaki Track leads down to the left. Rāpaki Rock itself is a striking radial dike which is popular with rock climbers.
Rāpaki Rock to Bridle Path
Tussocky walking past rocky outcrops for this entire section. From the car park, the walking and mountain bike tracks share a trail, leading around the end of Rāpaki Rock. The walking track splits off, skirts around Witch Hill, and soon drops to cross the road. The track edges along next to the road before crossing back near a rocky tor.
Past Tihiokahukura / Castle Rock, the track drops down to the Bridle Path. The Bridle Path was used by settlers travelling from the port of Lyttelton. Before that, it was a standard Māori route in and out of the harbour. The saddle is marked now by a little stone shelter "Memorial to the Pioneer Women." The Lyttelton road and rail tunnels pass under here.
The car park lies empty as this section of road remains closed to cars.
Bridle Path to Tauhinukorokio / Mount Pleasant
From the car park, the track climbs gently along the crater rim, past the Cavendish Bluffs look out and up past Mount Cavendish itself. The track passes on the damper harbour side, which is cloaked lightly with native scrub. Mount Cavendish is crowned by the Christchurch Gondola top station building. Hence this section of track has a higher number of walkers taking in the views of the harbour.
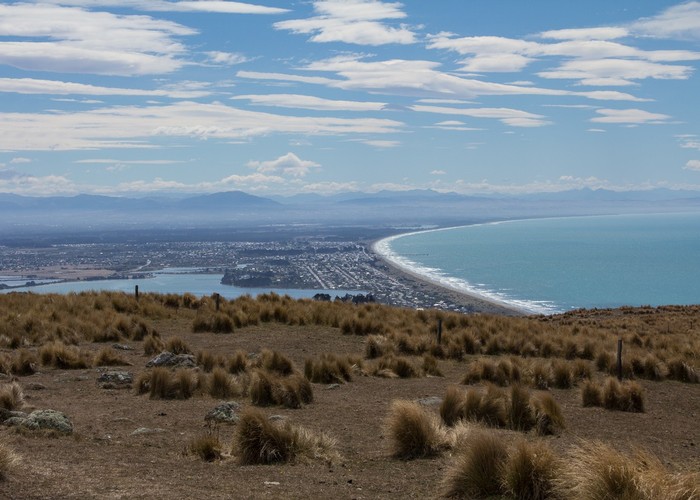
The track soon drops to the saddle at the top of the Major Hornbrook Track. This is the eastern limit of the road closure, so there are generally a number of cars here. An easy sidle with a few switchbacks leads uphill. A scattering of handsome speargrasses are amongst the tussock here. The track comes out on the shingle road of Broadleaf Lane. Turn right to take the road up to Tauhinukorokio / Mount Pleasant (499m). Some communications buildings are located here.
Walking times