Information may be incorrect: you are not viewing the latest version of this page. This version ID 15016 created 22 January 201422 January 2014 by ledgeledge.
A single day route from one beautiful lake to another involving travel in the Anatoki river to the saddle south of Adelaide Tarn which avoids scrub bashing.
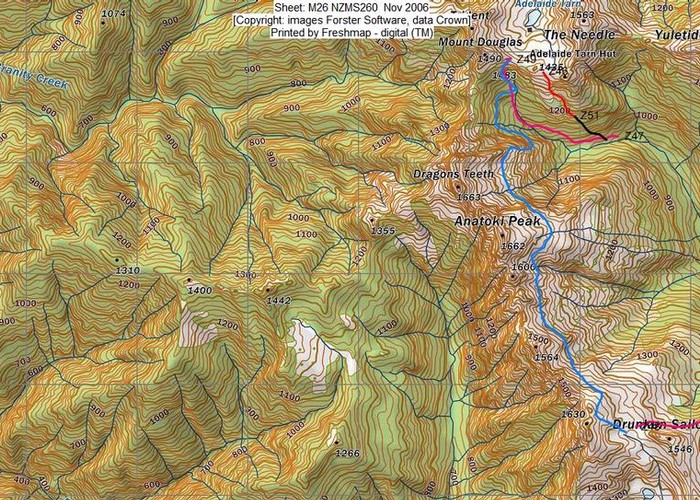
The jpg. file accompanying this illustrates the red route that a lot of people do from Adelaide Tarn and our pink routes. You may be lucky and be able to find the pink route down from the pass above Adelaide Tarn as the start of it is also the start of the high route to Lonely Lake. Otherwise you could just decide to try the red route and crash your way down through the scrub if you can't follow it.
I think the red route is acceptable for descents to the river but I would recommend the pink route if you're going up to Adelaide Tarn.
Apparently some guy has done some track work on the high route so you may get on to the start of it anyway. I’ve very crudely marked the high route in blue from a very old (1990) map but be warned it is as rough as guts as the map is very crude and simplistic. I think in actual fact people travel along the ridge from the pass above Lonely Lake to Anatoki Peak. There is a route description on the net by a guy called Tristan Riley about the high route. There used to be a wire but it was nasty and was removed in 1990.
Here is a bit of a route description describing the red route from Adelaide Tarn to LonelyLake: I've had these notes so long I don't know where I got them from! Feel free to give me more up to date feedback via the comments or email so I can amend these notes.
"From Adelaide Tarn Hut climb up behind hut to the lowest point on ridge under point 1435 above the upper Anatoki. There should be a short tussock spur with a small tarn on it below you. Descend this spur to the end of the stunted bush above the bluff and sidle across to your left (true left) and down under the rock bluffs under point 1435. Continue descending through bush to valley floor or where the ridge opposite meets the upper valley. There are several bluffs in the bush on this descent but keep below these. You should meet the Anatoki River just below a very bouldery section and a small stream coming off 1435 and Yuletide on the true left. There is a large rock cairn here.
Someone wrote a note about the sidling section (in italics above). "We had a short sidle at top (no more than 20m) and followed a dry watercourse virtually straight down to the valley floor. This was marked at the top with long johns and socks tied to trees and small blazes. A few cairns were lower down. We came to a rock cairn at approx M26 718 282. An hour’s descent through bush. An easily followed unmarked track leads to Pt 744 in one and a half hours. Route to Drunken sailors follows spur on true left, close to stream at bottom. Rock cairns here between 900 and 1200m..."
I can't recommend his route up to the Drunken Sailors as it is very scrubby and bluffy so I recommend you take ours which is marked in pink. However we did lose the track half way down, so if you find it, stay on it. People do go the way described above but it is very slow and scratchy. When I did the internet search quite a few people who had gone their way grizzled about scrub and bluffs. Our way had no scrub - just a nice track at the top. Of course it was some time ago and things could have changed. I recommend you study the hut books as that's how Frank worked out the best way for us and it did only take 6hrs and we weren't trying to go fast, only smart. Andrew Barker did his own direct route and it took him a bit longer. You can guess he travelled faster than us, being a fit solo tramper but we travelled smarter with our route.
Hope this helps!
JANUARY 2014 > BEST 'Low Route' Info
Having bailed on the 'low route' and done the 'slow route' via Anatoki Forks Hut, and up over Yuletide (like many others), I found this brilliant, detailed route guide in that hut, dated 5/01/2010. (Wish I had this earlier that day. A GPS would have also helped.)
...Ray Salisbury 'the ledge', Jan 2014.
1) The traverse right (east) below the Drunken Sailors starts close to the saddle, after a small, gentle drop to the right, directly from the saddle.
A cairned route through the scrub leads just above the point where the bush meets the ridge to the east of the Drunken Sailors.
2) At the end of the worn track on the more gentle sthn side of the ridge, there are 3 cairns close together, marking the entry to the bush. Bush-bash in the general direction of Pt .1406 opposite. NO BLUFFS.
3) Travel on true left of Anatoki is straightforward til the boulders above the junction with stream off Yuletide & Needle. At the bouldery section, ground trail is vague. Continue on true left til above the uppermost forks of the Anatoki headwaters.
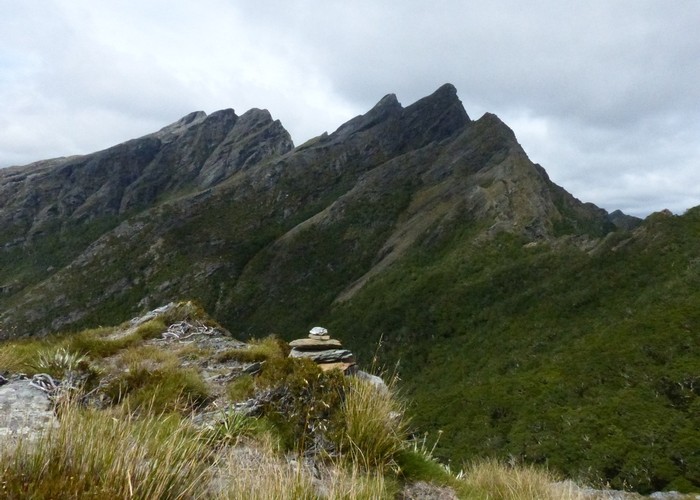
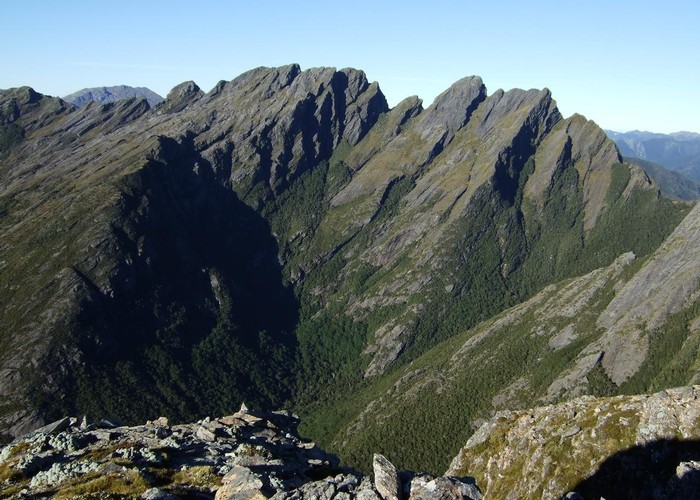
Anatoki Peak etc from Yuletide Ridge
• By glennj.
Licence: C.
In the basin below Mt Douglas is where the navigation challenge begins.
Numerous parties go either too far east or west when trying to find the saddle between Pts 1483 & 1435.
4) We left the stream, & after climbing 100s of metres, we encountered heavy scrub, backed off a bit. There's a line of bluffs at about 1300m. We sidled under these, heading west, in & out of bush, checking EVERY clearing, til we found the tiny one with cairns to the saddle. (The beech tongue directly west of this probably goes well too.) It was a small cairn in a small clearing, with a little tussock gut through the rocks, onto easier tussock above.
Have fun.