It is particularly good for anyone living in Wellington since they can stand on the quayside and know that they have tramped the skyline beyond the Hutt Valley. The track starts in Otaki Forks (20 kilometres from Otaki) and goes for 32 kilometres to Kaitoke. It normally takes 2-3 days but can be stretched out to 4 days by breaking the last day at Tutuwai Hut (making 38 kilometres in all). Note that this is a sub-alpine route that climbs to a height of 1529m and there is no shelter other than Kime Hut between the bushlines above Field and Alpha Huts. Several lives have been lost on this route (notably E. J. Kime), it should not be taken lightly. Alpine equipment is necessary in winter conditions and crampons are handy.
This route can be done in a weekend as follows:
- On Friday night, walk up to Field Hut just below the bushline (2-3 hours).
- On Saturday, traverse the tops to Alpha Hut (8 tiring hours).
- On Sunday, follow the Marchant ridge out (8 boring hours).
Access
From Otaki travel along the Otaki Gorge Road. From Kaitoke on SH2, the road end is up Marchant Road (past the youth hostel).
Up to Kime Hut
If you drive into Otaki Forks, be aware that much of the way is a single track dirt road - drive carefully and look out for oncoming traffic. The track starts from the large footbridge over the Waiotaura River about 5 minutes walk from the Gibbons carpark, past the caretaker's house (sign the intentions book). From the bridge climb the narrow ridge up about 40m to a plateau of farmland. Cross the plateau and turn right at the first fork to head up the hillside. There is a fairly steady gradient (300m in 1 kilometre) until the real bush appears.
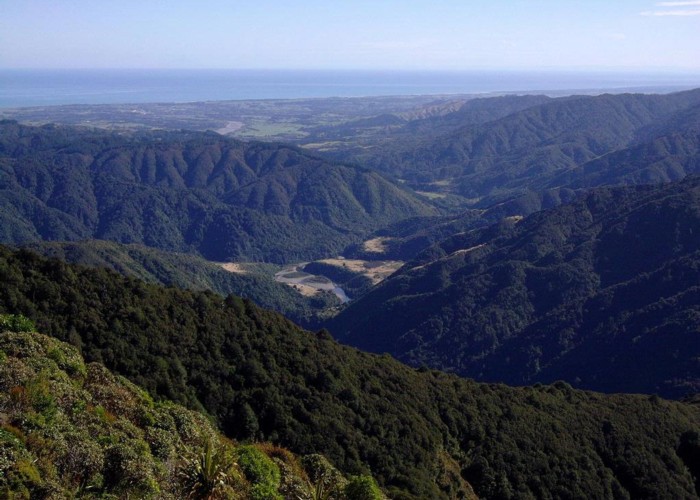
After you enter the bush, there is good walking to Tirotiro Knob which is sidled around and then Field Hut (sleeps 25) at a height of 866m. Expect to arrive at the hut around lunchtime - too early to stop but a good time for a brew and rest. Field Hut has been around for more than 70 years now so have a look around inside for the original pit-sawn timbers. The gradient now steepens as the track climbs beyond the bushline to Table Top (1047m) and then levels out before the climb to Dennan (1214m). Table Top is the northern end of a relatively flat section of ridge forming a sensitive area of alpine wetland. DOC have placed a gravel path and boardwalk across the wetland from Table Top to the base of Dennan (the pointed peak at the far end of the plateau).
The track sidles around the summit of Dennan and then drops a little back to the ridge. You pass around and over some small bumps and then ascend in earnest up the ridge to Bridge Peak (1421m). On Bridge Peak, the ridge broadens out and becomes level. After about 250 metres, the track descends a bit and then rises to Hut Mound (1440m). Kime Hut (sleeps 35, no stove or other heat) is now just below you in a small valley with 2 tarns (this was the only water here - there is a water tank now). On a popular long weekend like Easter, the hut can get full.
Crossing Tussock Tops to Alpha Hut
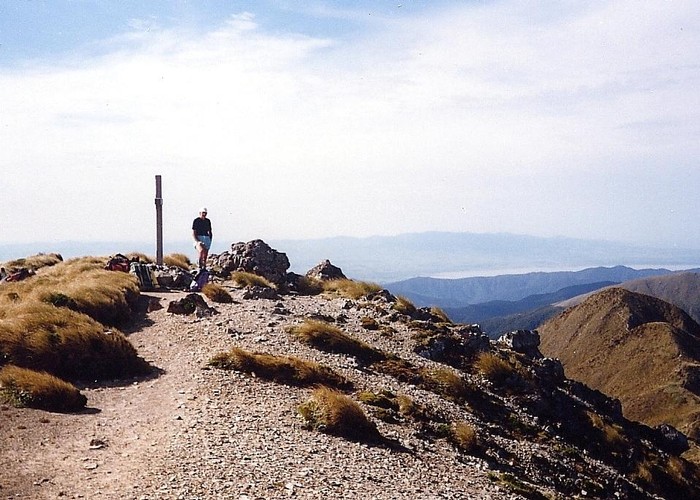
The next day starts with a good climb up 80 metres to Field Peak (1483m) where the views are marvellous - west over Kime Hut and Bridge Peak out to Otaki, north to the Tararua Main Range, east to Mt Hector and the peaks circling around to Alpha in the distance and south to the Hutt Valley and Wellington. The track continues with a sharp descent of 100m and even sharper ascent of 150m to Mt Hector (1529m). The summit of Mt Hector has a 2 metre wooden cross as a war memorial.
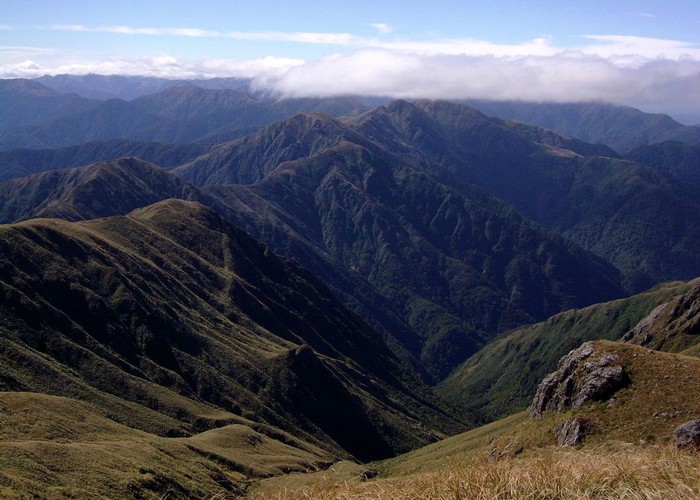
From the summit, there are excellent views over into the plains of the Wairarapa and the route onwards. The route descends and follows the ridge over the bumps of the Beehives (1485m) before a gentle fall and rise to Atkinson (1472m). Extending to the left of Atkinson is the False Spur ridge - take care to NOT descend this. The arc of peaks from Atkinson to Alpha is known as the "Dress Circle" for its panoramic views. The track continues from Atkinson to the right, passing over an unnamed peak and then swinging around and up to the flattish summit of Aston (1376m). The track drops 110m in the next 1 kilometre before the ascent to Alpha. The true summit of Alpha is 100 metres SW of the highest point of the track - worth a visit for the views of Wellington. The last kilometre down to Alpha Hut (sleeps more than 16 since its upgrading in 1996) will test your knees a bit with a fall of 260 metres.
Tutuwai Hut and out
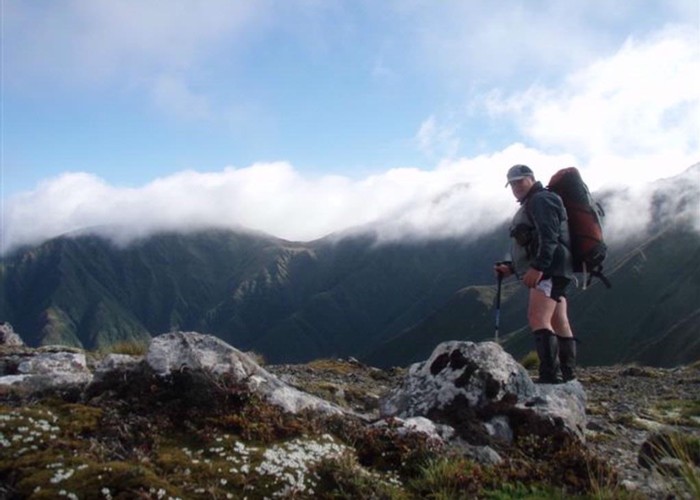
The next day is fairly easy, from Alpha Hut over the dip of Hells Gate to Marchant Ridge (the usual exit route) and dropping to the Tauherenikau River. From Alpha Hut the track drops a bit, rises to pass over a knoll and then drops sharply into Hells Gate (a drop of 200 metres over 400 metres travelled). There is a slightly less steep climb to a fork. The right fork takes you up to Omega (1118m) via an often muddy track (nice view southwards about 15 metres along and a few metres to the left of the track) and then out via Marchant Ridge. This is a good but long walk along the undulating crest of the ridge. There are a couple of good viewpoints, one about a third of the way along and the other on Marchant itself (3-4 hours from Omega) where an old burn is still regenerating. The drop down to the site of the old Dobson's Hut is fairly steep with easy walking from there to the road end.
From Hells Gate, The left hand (northwards) track goes through various clearings before reaching the stony Bull Mound (1060m) - it thus offers plenty of viewpoints. The descent into the Tauherenikau valley is via a clear, well-constructed track. By the time you get to the river, your knees would have had a good workout on the drop of 730m in 2.5 kilometres. However they will cool down fast when you ford the river (no bridge) to pick up the track from the historic Cone Hut to the modern Tutuwai Hut. Before visiting the comforts of Tutuwai Hut downriver, it is worth visiting Cone Hut (10 minutes up the track and back) which is one of the best examples of bush carpentry in NZ. The hut was built in 1946 and restored to its original condition in 1987 including replicating the adzed totara framing and totara slab walls.
Tutuwai Hut (sleeps 20) is 1 hour down the river from Cone Hut on a track that can be muddy. The river is fairly closely followed along grassy flats and bush terraces except for one short section where it is forced away from the river.
The track from Tutuwai Hut to the carpark at Kaitoke is quite good except at one point. About 1 kilometre down from Tutuwai, the track meets Slip Stream in a clear pebbly stretch by the river. The track resumes on the other side of the clearing on top of a 10 metre embankment (at the remains of an old swingbridge). The climb up the embankment is extremely steep and slippery.
The track continues to a swingbridge across the river and then down the other bank to Blue Slip. At the foot of the climb over Blue Slip, you have a decision to make - either follow the track as it climbs over various obstacles down to Smith Creek or walk down the river. The river is walkable right down to Smith Creek where the track is easily regained. If the weather is wet then Smith Creek Shelter makes a good place for afternoon smoko.
From the shelter, the track goes up Smith Creek (usually a good distance above it) until it starts up a ridge. Halfway up the ridge the track sidles along the hillside to Puffer Saddle. This section is a good chance to have a last look along the Tauherenikau valley. At the saddle there is a good view across farmland to the top of the Hutt Valley. There is a gentle descent from the Puffer down to the car park. If you are being picked up, it may be better to walk for a few minutes down to the Kaitoke Shelter where the road is tar-sealed. The Youth Hostel is a further 2 kilometres on where the road meets State Highway 2.